Designing a model railroad is a continuing education. Over the years I experimented with various ways to make the small control panels and track diagrams needed around the layout. This is how I do it now.
First I create the panels in Adobe Illustrator drawing software, then I print them on a color printer (inkjet and laser work equally well). Next, I cut a piece of 1/8" clear plastic sheet the size of the printed panel. I lay the printed panel on top of the plastic and center-punch the locations of switches and lights, then drill those holes.
The neat part is affixing the printed panel to the plastic. I spray a light coat of 3M #77 adhesive on the front (printed) side of the paper panel, then lay it on the back of the plastic. Yes, the paper is glued to the back side of the plastic, and the printing shows through the adhesive! Gluing the paper on the back of the plastic protects it from wear and tear.
This technique works very well, as can be seen on the pane in front of the clock. The large hole was cut from the paper prior to gluing, but the black area surrounding it and the gold "Regulator" were sprayed with adhesive and show almost no blurring or matting from it. Likewise, the Roanoke train order box is crisp and easy to read.
The clock face – also made on my personal computer – is only 3½ inches in diameter. Fast clocks are mounted in assemblies that hang beneath the benchwork, and usually incorporate a sloped shelf to hold paperwork. I find it very convenient to glance at a clock installed slightly below the layout, instead of high on the wall or a lighting valance. There are nine fast clocks around the layout, plus two more in the dispatcher's office (one faces the crew lounge).
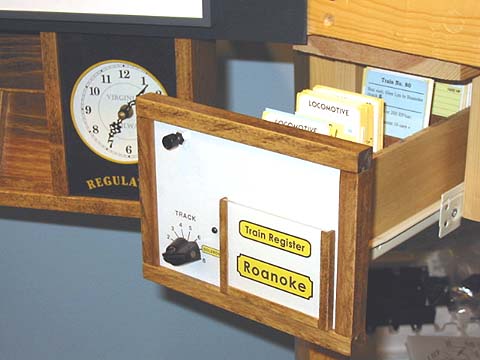
This photo also shows the controls for the staging yard controller described in the May 1999 issue of Model Railroader. This electronic device allows crews to confidently run trains into or out of a hidden staging yard by aligning the switches for the desired track and monitoring the train's progress, signaling when it has entered and cleared the yard throat.
I built a small drawer with numbered compartments, one for each staging track. Inexpensive, yet free-rolling drawer slides are available at most home improvement stores; mine cost about $6.00 per pair.
Outbound crews are given a card describing the purpose of their train, and which track it's on in the staging yard. They pull the car cards and waybills from the drawer and go on their way. Upon arrival, inbound crews pull into the track specified on the train description card, and deposit their paperwork in the associated drawer pocket.
After building the drawer, the next logical step was to incorporate the staging yard controls right on the drawer where the crew will be looking. A simple panel holds the controls (and a train register box for register stations). One nice touch on this panel is the yellow station sign that matches those at modeled towns; it serves to emphasize that this drawer is the destination town. A three-color signal by the track (not on the panel) delineates the start of the staging yard, and shows train progress in it.