In reality, the only Virginian track at Glen Lyn was on the famous 2,155-foot bridge crossing the New River into the West Virginia coal fields.
I freelanced a freight yard beneath the bridge, to classify merchandise freight from my fictitious Danville Division and from the C&O interchange at Hinton.
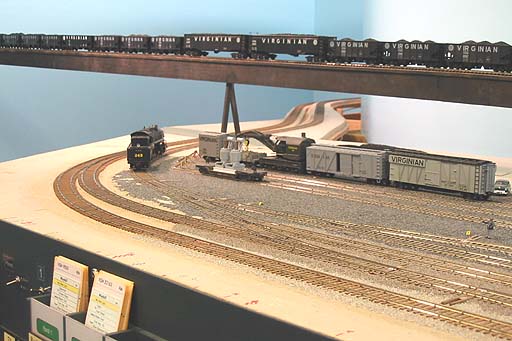
In this photo, looking right-to-left, the tracks are: Mainline, two arrival/departure tracks (A/D track 1 has the string of empty hoppers and caboose), and four classification tracks (the 0-8-0 switcher is near class track 2). The caboose track is in the distance, to the left of class track 4. The engine terminal can be seen on the right.
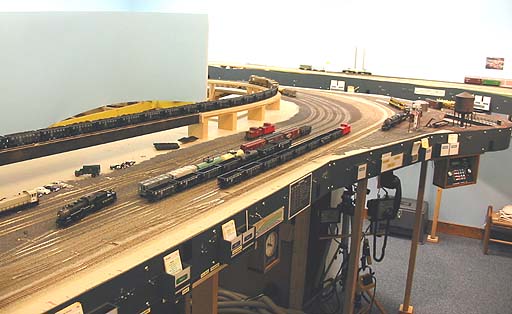
The approach to the bridge is on the top-center of the photo, with the east end of the temporary bridge attached to it. The bridge parallels the yard tracks and punches through the wall to the left of the drill track (see the next photo) into Elmore staging.
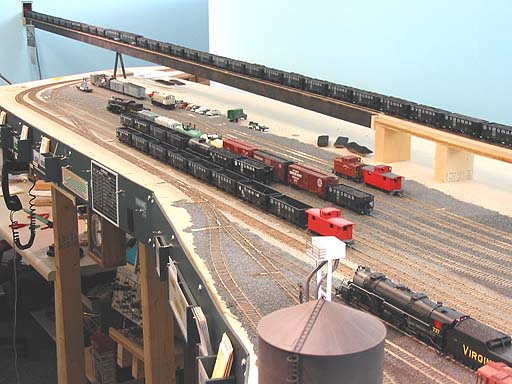
A better view of the yard throat area, showing (left-to-right): Main, the two A/D tracks, and the four classification tracks. Two car-repair (RIP) tracks and the wreck train track are visible just inside the curve of the mainline and drill track.
I built a temporary bridge from 1/4"-thick wood lath glued into an upside-down U-channel. The black-painted span in the photo is 142" long; Tall steel support towers were planned but never built. The entire bridge and approach are on a 2.6% grade, descending eastward (the prototype was 0.8%).
And here's the first train over the Glen Lyn bridge! An EL-3A electric locomotive pulls a string of 31 empty hoppers westward toward Elmore. (And, yes, the train can stop and start again while on the bridge.) The track worked flawlessly - more than can be said for the EL-3A with a defective DCC decoder that wouldn't respond to the throttle after it started moving, and a misaligned coupler that was only 1/3 mated with the lead car.

To aid the yard crew in planning their work, I mounted a schedule of trains on the fascia. It resembles the common blackboard schedule found at many depots, but it's really just a list of trains the yard crew can expect to see.
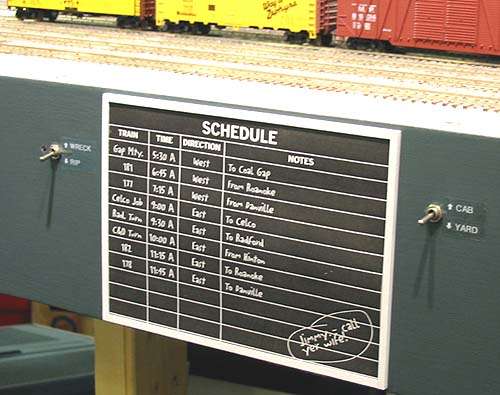
The schedule was easy to make using Adobe Illustrator on my computer (it would be just as easy with a word processor instead). I chose a black background with white lines and lettering, and a hand-printing style typeface (named, believe it or not, "Litterbox").
The frame is made of stripwood glued to a thin sheet of styrene. It's built in two layers (the top layer overhanging the bottom layer), with a slot on one end, so the printed schedule can slide in and out for updating.
Early in the design, the drill track was on the east (right) end of the yard, and the classification tracks were on this, the west end. I was struggling to make the class tracks long enough, so I decided to flip the yard end-for-end, and run the drill track along the river.
Doing so, I was able to shift the entire yard westward and lengthen the class tracks significantly. And this didn't compromise the length of the drill track - it's over 10 feet long (it extends beyond the top-right corner of the photo).
Two RIP tracks and one for parking the wreck train nestle inside the curve of the drill track. The mainline from Hinton comes in on the left, and splits off into the no. 1 arrival/departure track.
This is the east end of the yard, where the mainline (lightest ballast) curves around the end of the peninsula toward Rich Creek.

The engine terminal is nearly complete. Tracks, left-to-right from the mainline are: Diesel service track (with the long curved concrete platform); sand and diesel fuel supply track; west turntable lead; coal and ash track. Behind the diesel fuel tank in the distance is the east turntable lead, a stores track, and a steam engine ready track. A tiny piece of an aisle-side roundhouse may be modeled, but space is tight.
Here's a closeup of the EasyDCC command center mounted beneath the engine terminal. The frame is made of 1/2" "craft wood" and holds the command center panel at a convenient angle.
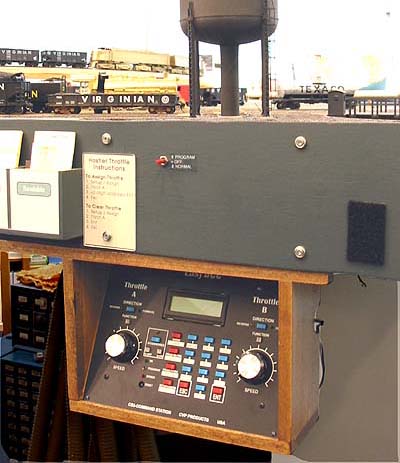
The righthand throttle controls the turntable directly above, and the lefthand throttle is available for hostling engines. Instructions for assigning the throttle to an engine are on the fascia nearby. The red toggle switch controls the programming track, which doubles as the stores track next to the turntable.
Here's a sample of the "control panel" for the Glen Lyn yard. Toggle switches are mounted on the fascia and aligned with the turnout's headblocks. A small label names the routes through the turnout.
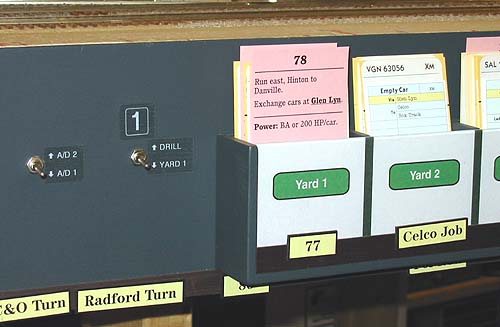
I built boxes to hold waybills for each track. They're clearly labeled with track numbers, and have a magnetic strip at the bottom so yard crews can affix train identifiers that can be changed as the work progresses.
The train tags and strips are made of 1/2"-wide magnetic material available at office supply stores. This is self-adhesive on one side, and it's easy to cut to length and affix to the waybill boxes. I also applied a long strip along the bottom of the fascia to hold the unused train tags.
I used my computer word processor to make the train tags, then cut them out and stuck them to the magnetic strips. A black permanent marker touched up the raw edges of the paper.
This small track diagram helps boomers find their way around the yard, but regular crews soon refer only to the toggle switch labels.